

How to Configure SAML Authentication - Using MOVEit and Azure AD
Federated identity based authentication is (and should be) the holy grail of all IT Security authentication policies. Something which all IT teams should be looking to introduce to all cloud and third-party hosted solutions. Controversial opinion? I don't think so, but I am happy to be debated on the topic.
In this blog, we will be covering federated identity authentication - particularly, SAMLv2 based authentication - by demonstrating how to connect Progress MOVEit Transfer with Microsoft Azure AD.
Progress MOVEit Transfer is a very popular and widely used managed file transfer solution, which we often blog about. Microsoft Azure AD is Microsoft's cloud based user directory solution, much like its namesake Microsoft Active Directory. Neither of these two solutions are a requirement for SAMLv2, they are simply being used and referred to for demonstration purposes.
What is Federated Identity?
It should be no surprise to anyone that over the past five or more years, the uptake in cloud based solutions has been enormous. Consider the use of Office 365 alone!
With client based applications increasing shifting outside the traditional network boundary, management authentication and identity has become a challenge.
- Should users have to authenticate to each service?
- Will they remember each password they have created?
- What happens when an account becomes locked?
These challenges are mostly headaches for users, however we should also consider the security implications for the organisation. Accounts not centrally managed are not managed at all.
- Are accounts stored using sufficient controls?
- Are password requirements strong enough?
- Can the IT team revoke access on all services when an employee leaves the organisation?
You have probably guessed it by this point, but the proposed solution of federating identity, simply means that identities are held centrally; and therefore managed centrally. Outside services then communicate back to the federated identity provider to perform authentication.
Accounts can then be created, managed, secured and disabled from one central point.
Note. That we have really focussed on cloud-based technology here as this is an area which is highly complemented by federated identity solutions. However, federated identity solutions have their roots in extending on-premise authentication servers to other on-premise services. Even those which might be installed and hosted in a partner business.
What is SAMLv2?
Security Assertion Mark-up Language (SAML) is a standardised mechanism for exchanging authentication information for federated Identity workflows.
The basic premise is that there exists three entities:
- The user, who present in the workflow in the proxy that is the web-browser.
- The identity provider, where the identity or user account exists. This is often referred to as an IdP (Identity Provider).
- The application or service which the user is attempting to log into. This is often referred to as the SP (Service Provider).
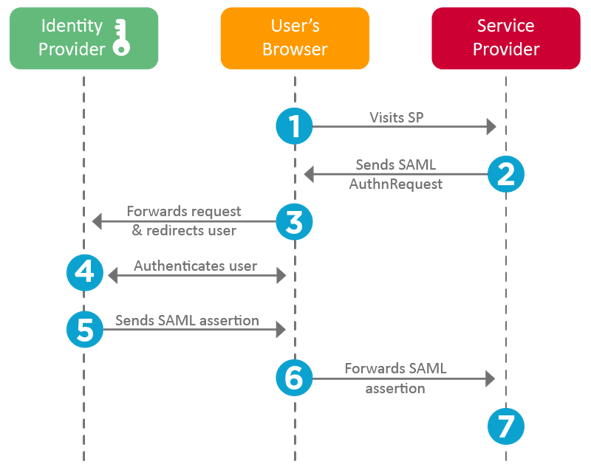
The workflow takes place as follows:
- The user attempts to log into an SP. This can take place through a mobile application or a web-browser.
- The SP recognises that this is a federated account by its username - you might notice that some SPs prompt solely for a username before a password. The SP sends an encoded authentication request to the user's browser which contains the address to the Idp.
- The user's browser the forwards this authentication request to the IdP specified in step 2.
- The IdP now takes over the authentication workflow; and prompts the user to authenticate with it directly. The SP never sees the authentication attempt take place.
- If the user succeeds in authenticating against the IdP. The IdP will send a SAML Assertion to the user's browser, which acts as a token of successful authentication; and contains the AssertionConsumerInterface URL, which is where the assertion must be sent to.
- This assertion is the sent back the SP from the user's browser, allowing the user access to the SP.
The most important aspect of this workflow is that authentication never takes place between the user and the SP; and therefore the IdP retains full control of the account at all time.
How to Configure the SP?
In this blog, we are using popular managed file transfer solution Progress MOVEit Transfer as an SP.
- Sign into MOVEit Transfer as an organisation admin.
- Navigate to Settings > Security Policies > User Auth > Single Sign-On.
- If you haven't configured MOVEit Single Sign-On before, you will need to press the Configure Service Provider button.
- Pressing this button will prompt you to create two certificates used for signing and encryption during the authentication request and SAML assertion transfers. Create both certificates and return back to the Single Sign-On settings page.
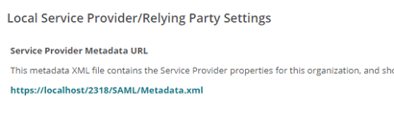
- The SP settings and certificates are now stored in a XML file which can be downloaded and uploaded into the IdP.
- Download this XML file and save it somewhere which you can return to when configuring the IdP.
How to Configure the IdP?
In this example, we are using Microsoft Azure AD as our IdP. We have chosen Azure AD simply because it is the most common IdP that we are asked to work with.
- Log into your Active Directory Portal and add a non-gallery application.
- Configure single sign-on for the new non-gallery application.
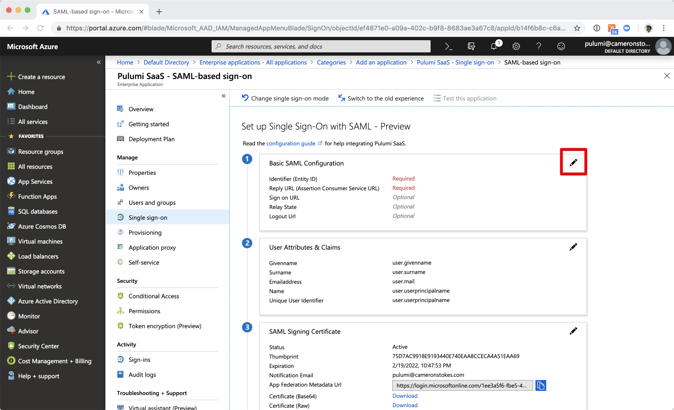
- Upload the XML file downloaded from the SP into the non-gallery application.
- The required fields in section one should now be populated with the URLs used by MOVEit Transfer. Note that these URLs are configured in MOVEit by signing in as a SYSADMIN and editing the properties of the organisation.
- Download the federated metadata XML file from Azure AD.
- You must now upload this XML file into MOVEit Transfer from the Single Sign-On settings page > Add Identity Provider.
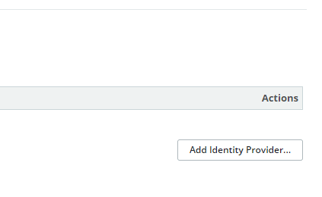
- Once uploaded, MOVEit will display the configuration settings which relate to this connection.
- In particular, you will want to ensure that the IdP is sending back a username - in the SAML assertion - which matches a username in the SP. This is known as the SAML subject.

- The values in the drop-down menus are populated by meta data in the XML file sent from the IdP. This needs matching to the fields present in MOVEit. In this case, Azure AD uses the NameID field for storing the users email address, which in MOVEit we are using for both the username and the email address fields.
- The full name is being provided by a claim which is set up based on the recommendation of Microsoft.
- Press Save to complete the set up.
Conclusion
With the steps above completed, the user should now be able to sign into MOVEit using their Microsoft Azure AD credentials. The credentials are never stored by MOVEit and thus all risk and management lies with the IdP system.
For obvious reasons - some of those listed earlier in the blog - federated identity solutions, and particularly SAMLv2 based authentication has become very popular. We are often asked to assist with setting such solutions up; and helping to design authentication workflows which include other security provisions such as multi-factor authentication (MFA).
If you would like assistance with setting up Progress MOVEit Transfer to support SAMLv2 based federated authentication, you can book a call with us.
|


